
Quick Start
What you will learn/build: A simple, repeatable file naming rule, a clean folder structure, and a three-tier backup workflow for creator projects.
Skill level: Beginner — no coding required. Basic computer skills helpful.
Time needed: 30–60 minutes to set up the system; 5–15 minutes daily or weekly to follow the workflow.
What you need: Your working computer, one external drive (USB/SSD/HDD), and one cloud storage account (Google Drive, Dropbox, OneDrive or similar). Optional: basic syncing tool (rsync/Robocopy) or a backup app.
Introduction: Why this matters for creators
As a creator you produce many files: drafts, source files, exports, images, captions and final versions. A simple naming and folder system makes files findable, shareable and reusable. A backup workflow protects your hours of work from hardware failure, accidental deletion or version confusion.
Principles of a good creator file system
- Consistency: Use the same pattern every time so you can search and sort files easily.
- Readability: Names should make sense to you and collaborators without opening the file.
- Versioning: Keep a clear version number or status word (draft/final) in the filename.
- Separation of source and export: Keep originals (working files) separate from final exports.
- Backups: Follow the 3-2-1 rule adapted for creators: 3 copies, 2 different media types, 1 copy offsite (cloud).
File naming template (simple, searchable)
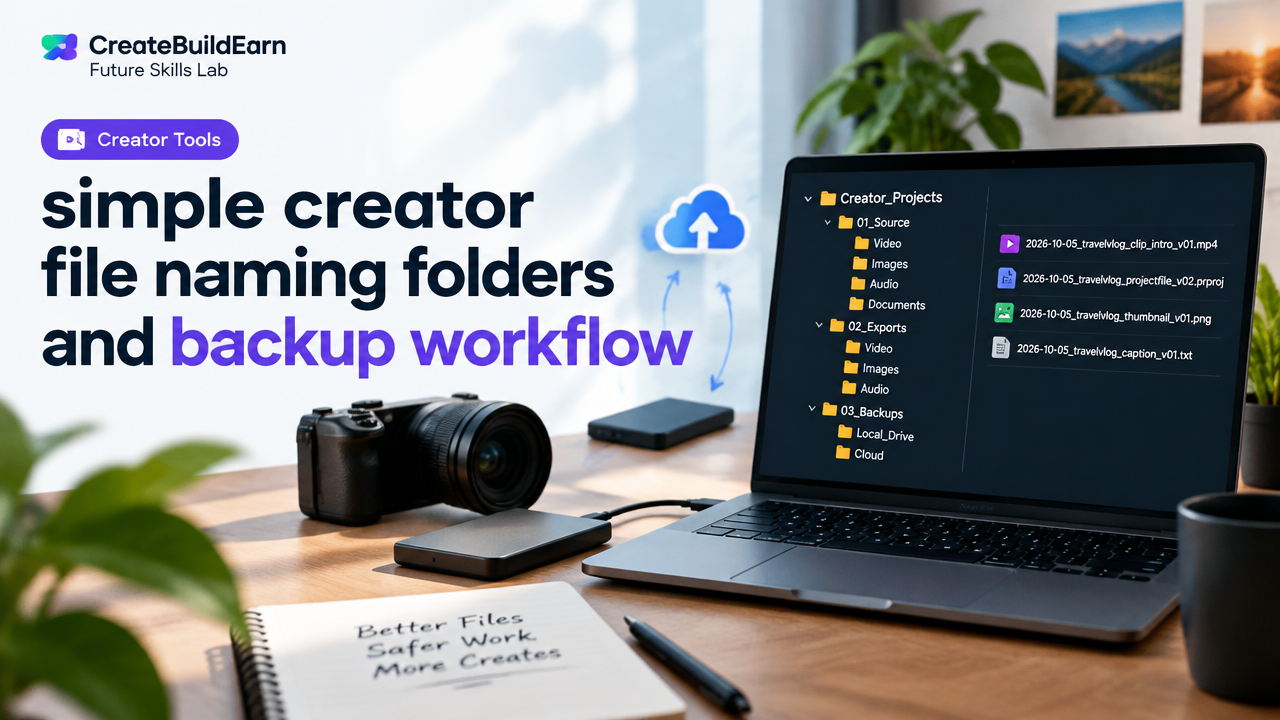
Use a compact template that includes date (ISO format), project key, asset type, short description and version. Example pattern:
YYYY-MM-DD_project-short_assettype_description_vXX.ext
Worked example:
2026-10-05_travelvlog_clip_intro_v01.mp4
2026-10-05_travelvlog_projectfile_v02.prproj
2026-10-05_travelvlog_thumbnail_v01.png
Notes:
- ISO date (YYYY-MM-DD) sorts correctly by time.
- Use hyphens or underscores instead of spaces.
- Keep project-short as 1–3 words (no spaces) for easy sorting.
- Use v01, v02 for versions. Increment on important changes only.
Folder structure: one clear layout for every project
Make a reusable folder template you copy when you start a new project. Example structure:
Project-ShortName-YYYYMMDD/
  01_source/          (working files: PSD, PRPROJ, source images)
  02_assets/          (stock, fonts, music licensed)
  03_exports/         (final renders, MP4, JPGs, PDFs)
  04_docs/            (briefs, scripts, captions, invoices)
  05_archive/         (older versions kept monthly)
This order (01, 02) keeps folders sorted the same on Windows and macOS.
Step-by-step setup
- Create a “Projects” root folder on your computer or working drive.
- Save a “Project Template” folder with the folder structure above. Copy it for each new project and rename using the date and short name.
- Agree on asset type short-codes you will use (clip, projectfile, thumb, raw, edit, export, audio).
- Decide version rules: v01 = first export, v02 = revisions. Keep only important v-numbers in final folders to avoid clutter.
- Set up backups (see next section) and test restore once after setup.
Backup workflow (three-tier simple plan)
Follow a three-step backup workflow that is practical and low-cost for most creators in India.
- Local working copy: Your computer or external fast SSD where you edit. This is the active workspace.
- Local backup (weekly): Sync the entire Project folder to an external HDD/SSD. This protects against primary drive failure.
- Offsite backup (monthly or weekly depending on importance): Upload the Project folder or key exports to cloud storage. Keep only important files and final exports in cloud to reduce cost.
Tip: For version safety, keep a monthly archive folder inside 05_archive with ZIP of final files and a short changelog text file.
Practical tools and learning example
Tools you can use:
- Manual copy + paste (works fine for beginners).
- Free sync tools: rsync (macOS/Linux), Robocopy (Windows). Use with care—test before scheduling automatic runs.
- Cloud providers: Google Drive, Dropbox, OneDrive. Verify privacy and storage costs for large video files.
- Backup apps: Free and paid apps exist to automate local and cloud backups—compare before using.
Example rsync command (learning example for macOS/Linux):
# Learning example — do NOT run without checking paths
rsync -av --delete "/Users/you/Projects/ProjectX/" "/Volumes/BackupDrive/ProjectX/"
Warning: rsync options like –delete remove files on the destination to match the source. Test with a small folder and remove –delete until you understand the behaviour.
Worked example: From idea to safe archive (case study)
Imagine you recorded a short video on 2026-10-05 for a travel vlog. Steps you would follow:
- Create project folder: TravelVlog-20261005 and copy the Project Template into it.
- Save raw camera files to 01_source/raw and name files with date and clip number: 2026-10-05_travel_clip001.MP4
- Edit in editor and save project file to 01_source/projectfile: 2026-10-05_travel_projectfile_v01.prproj
- Export a first draft: 2026-10-05_travelvlog_edit_v01.mp4 → save to 03_exports
- After review, export final: 2026-10-06_travelvlog_final_v01.mp4 and move older drafts into 05_archive/2026-10
- Weekly: sync Project folder to external drive. Monthly: upload 03_exports and 05_archive monthly ZIP to cloud.
Try It Now / Mini Project
Set up a project for a simple image or video piece in 20–30 minutes:
- Create Projects/Practice-Project-YYYYMMDD on your computer.
- Copy the folder template into it and create one sample file in 01_source and one in 03_exports using the naming template.
- Perform a local backup: copy the Practice-Project folder to an external drive.
- Create a ZIP of exports and upload the ZIP to your cloud account.
- Write a short changelog.txt in 05_archive describing what you changed.
Checkpoint: Self-review
Ask yourself these quick checks:
- Can you find yesterday’s working file within 30 seconds?
- Is there a v01/v02 pattern for your exports?
- When did you last test a restore from external and cloud backups?
Common mistakes creators make
- Using spaces and long sentences in filenames—this breaks some tools and slows searches.
- Relying only on one copy (no backup).
- Backing up everything to cloud without checking privacy or storage cost for large raw video files.
- Over-versioning (v01a, v01b, v01c) without a changelog—this creates clutter.
Review checklist (copy and use)
| Task | Done |
|---|---|
| Project template folder created | [ ] |
| Naming pattern agreed (date_project_asset_vXX) | [ ] |
| Local weekly backup set | [ ] |
| Offsite cloud backup scheduled | [ ] |
| Test restore completed | [ ] |
Next practice and growth
Do this next:
- Automate one backup step with a scheduling tool or simple script (test carefully).
- Apply this system to a real client or portfolio project. Document steps in a short project case study.
Useful internal links for next learning steps:
- Video Editing Workflow Clips Timeline Audio Captions Export — for editing and export practices.
- Build First Portfolio Website Project Plan and Progress Log — publish and showcase finished work.
- Cybersecurity Basics: Passwords, Phishing, Updates, Backups and Privacy — protect accounts and backup safety.
- Student AI Privacy Checklist Before Uploading Personal Information — check privacy before sending sensitive files to cloud or AI services.
Frequently Asked Questions
How often should I back up my files?
At minimum: weekly local backups and monthly offsite backups. For active or client work, do daily local syncs and weekly cloud backups. Choose a schedule you will actually follow.
Should I keep every version of a file?
No. Keep major milestone versions (v01 final, v02 final). Use a separate archive folder for older drafts and compress them monthly. Keep a short changelog.txt explaining what changed.
Is naming with dates necessary?
Yes. ISO dates (YYYY-MM-DD) make sorting by time automatic and avoid confusion across regions. They also help when searching in large folders.
Which cloud provider is best for creators in India?
There is no single best provider. Choose one you trust, check storage costs for large media, and verify privacy settings. Keep a copy of important files in more than one place where practical.
Can I use version control (Git) for creative files?
Git is excellent for code and small text files but not ideal for large binary files (video, PSD). For those, use structured versioning and archival backups or tools that support large file storage.
How do I safely sync large video files to cloud without huge bills?
Upload only final exports or compressed proxies to cloud. Keep full raw footage on local or external drives. Consider using cheaper archival cloud tiers for rarely accessed raw files.
What if I accidentally delete a file?
Stop working in that project folder and attempt restore from your local backup drive first. If unavailable, check cloud provider trash or version history. Perform regular test restores so you know the process.
Conclusion and next skill to learn
Setting a simple, consistent file naming system, clear folder template and a three-tier backup workflow prevents confusion and protects your work. Start by creating one Project Template today and run the mini project exercise.
Next skill to learn: document one finished project as a short case study to improve repeatability and show your process. See Write a Project Case Study for a Beginner Portfolio for a practical guide.
Learn it by building something
Use the guide as a learning checklist, build a small version yourself, test it, explain what you learned and then improve the project.
How this guide was prepared
This guide is prepared for everyday readers using practical research, usability checks and editorial review. Product or tool-specific claims should be verified against current official documentation when needed.
How did you like this article?
Your feedback helps us make our guides more useful.



Join the Discussion
Join the conversation and share a useful tip, question or experience.